Load Lab
Testing
Equipment
Destructive
Testing Web Site
Created by Delbert L. Hall, Ph.D.
ETCP
Certified Rigger - Theatre and ETCP Recognized Trainer

Load Lab Home Test Data Testing Equipment Support/Sponsors Suggestions
Below is a schematic drawing of the Load Lab equipment set up
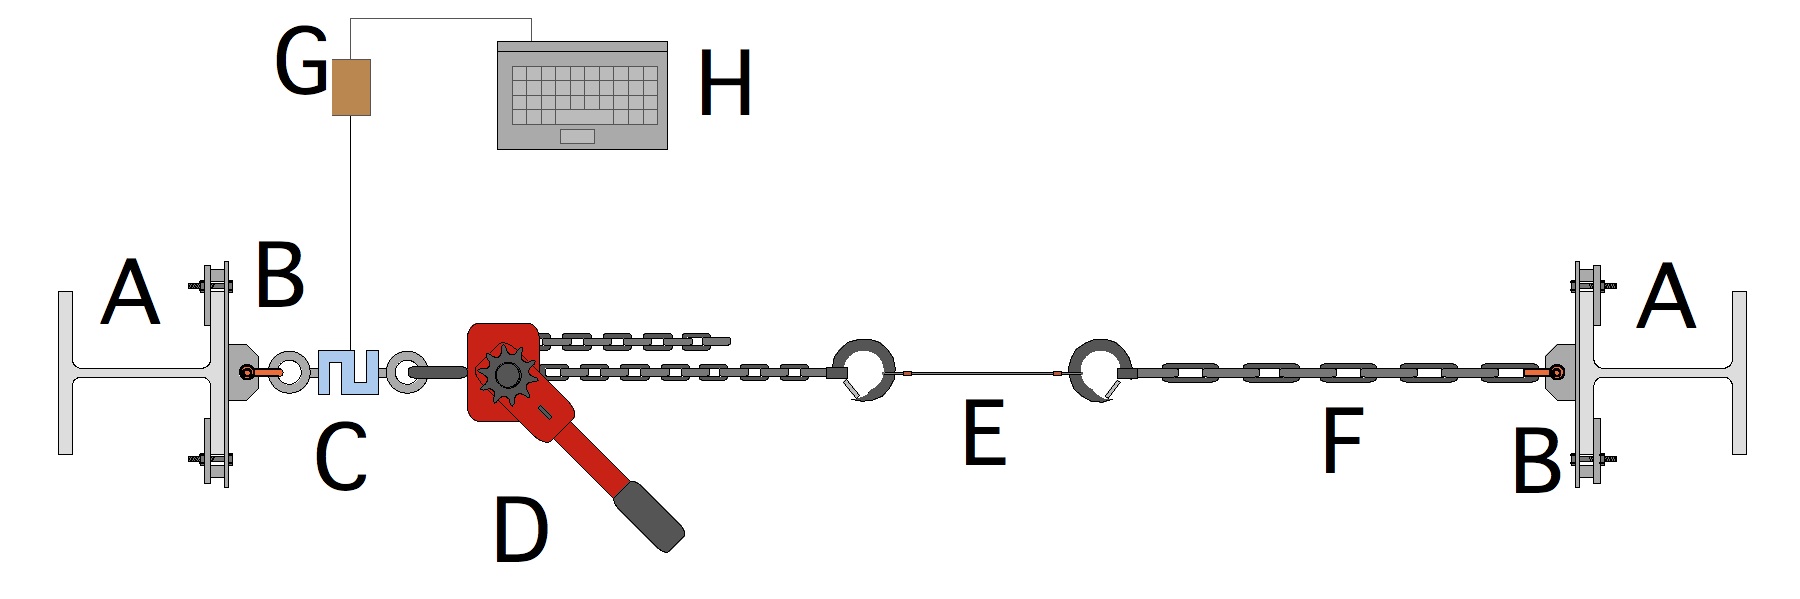
A - 8" I-beam columns B - Beam clamps (WLL 5,000 lbs.) C - Fuktek load cell (capacity 10,000 lbs.)
D - Ratchet chain hoist (capacity 4,000 lbs. ) E - Sample being tested F - S.T.A.C. Chain (WLL 12,000 lbs.)
G - DataQ Instruments strain gauge H - Laptop computer running WinDAQ (data acquisition software)
The sample being tested (E) is
connected between the hook on the chain hoist (D) and a length of STAC
chain (F). The chain hoist is used to put tension on the sample
(and all parts of the system which are in line with the sample).
The load cell (C) senses the tension via a strain gage and the data
acquisition system (G) scales the strain gage signal to +/- 5V,
digitizes it, and sends the resulting reading to the computer (H) via a
USB cable. The software running on the computer then displays the
tension in both numeric form and as part of a graph.
Typically, I will set the sampling rate at 60 samples per second. This is done within the WinDAQ software. I will set the software to display two virtual gauges on the screen, in addition to the graph of the data. One display will show the current stress on the load cell, and the other will display the highest reading that the load cell has measured over the past 10 seconds. This second virtual gauge will hold the peak load reading for 10 seconds after the sample fails (which gives me time to record it).
Since there is a small amount of backlash in the chain hoist mechanism the tension on the sample diminishes slightly between ratchets. While this may not be "ideal," I test all samples in a consistent fashion so results should be comparable.
New Destructive Testing Rig
View photos of the New Destructive Testing Rig
Understanding Test Results
Now that you have seen the basic setup of the rig, you understand that the force applied to the test sample is achieved by manually using the ratchet chain hoist (D). Although I try my best to perform all tests exactly the same way, because this is a manual process, the speed in which the force is applied varies slightly from one sample to another. Just as gas mileage can vary depending on how the car is driven, the results of tension tests can change based on the speed that the force is applied. Having done hundreds of tests, I have noticed that the faster the load is applied the lower the BS tends to be (which is why shock-loading should be avoided). I have also noticed that materials that have greater stretch, like GAC, tend to show less deviation in their results than materials with less stretch (shackles, for example). Because the loads in my tests are applied manually they may more closely resemble "in the field" results than "test lab" results. Whether this is a good or bad thing is up to you to decide. It is what it is. Knowing how the tests are performed can help you better understand the results
Copyright
2008 - Delbert L. Hall